If you are wondering what the title means, it is a quote form from Rocky IV
It was the only thing that I could think of that captured the moment that at this present time I happen to going through.
I have a challenge that I must concur.
~
A few week's ago the local Library had a lecture series on the Civil War and had invited living history people from the surrounding area to come and be "eye candy" for the day.
While being "eye candy" we happened to meet the director of living history at the high desert Museum.
Got to talking, and found that we all had the same basic concept when it comes to living history. So we where invited to the Museum to have a meeting with her to talk about the possibilities of having a mini reenactment.
During the course of this meeting we found that we might want to start volunteering for the living history.
~
The year that the museum portrays is 1904, this is far different from 1863...
But being happy to have a excuse to sew any type of new costume I am jumping in head first.
When thinking about what all I need to sew I knew that to get the right 'S' curve shape so famous from the early 1900's I knew that my current corset would NOT work...
~
So to find a pattern that I like.
~
Ageless patterns
#1339 1902 modern corset.
size- 35'' bust, 24'' waist.
So to find a pattern that I like.
~
Ageless patterns
#1339 1902 modern corset.
size- 35'' bust, 24'' waist.
When looking for a pattern there times when you see a pattern and you know that it IS the one, so it was with this pattern.
When I got it I was very excited, until I took out and looked at the instructions....
This picture shows the original instructions translated from French...This page is the more "modern" instructions...
They aren't that much better..I have never been good at following instructions. I have only of late been able to decipher the most simple ones, so when faced with something like this, I get just a little intimidated.
Then I remember that I LOVE challenges of this sort! I relish at figuring out things that seem at first, second, and third glance to be completely stupid.
I have brains, this doesn't, prepare to be conqered!!!
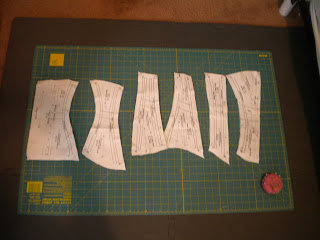
The sheet with the pattern pieces.
After a few minutes of grumbling about how stupid this pattern is, I decided that I need to get to work and see what I was really up against.
So I set up my machine in my room so I could have complete concentration on what I was doing and got busy.First figuring out in what order the pieces go.
Then cutting out and carefully labeling each of the pieces.
So I wouldn't get lost.
Sewing.
More sewing.
Finally after getting the pieces all put together, seeing what need to be done about fitting.
After trying it on, I realised that it didn't seem that long... In the description it said it "rides low on the hips" when this barely came to the top of my hips. I got out my 1863 corset to compare, and sure enough, it was almost the same size!
When seeing this, I had to stop and think.
I Finelly figured out the problem.
This pattern is a reproduction of a real one that came out in 1902,
Back then people where a lot shorter.
I, coming form good old eastern European farm stock and being tall in the first place. Let alone the fact that in the 19th and 20th century the average height for a women was 5'
and I am 5' 8''...with a long torso to boot..I needed to lengthen it!!
(Just look and see how short this thing is!)The next day I started the process of my second mock up.
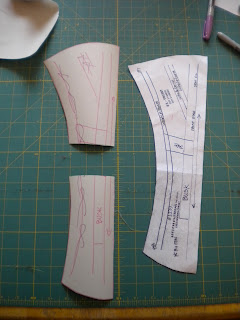
First, tracing the pattern peices onto paper.Cut a straight line in the middle of the peice,
Put a piece of paper 4'' long, glue it back together, reshaping the curve to make it look right.
poof presto, a longer pattern piece!Repeat for all pieces.
Making sure that the line you cut on is even through out the finshed piece...
you don't want to just cut a line across, for it to work right you need to KEEP THAT LINE EVEN!Cut out the new and improoved pieces.
Sew.
compare to first mock up and 1863 corset.
YAY!
It fits, it fits, itfits!
well, mostly. The length is fixed.
The hips where a bit to big, but this can be fixed with a snap of the fingers.
The next step was to figure out what size and how meny boning I needed.
The original pattern had about 38 boning all together..This is about 40 some-odd doller's worth. I was able to comprumise to 30, with out destroying the structure that is created BY the boning.
I still need to order the boning but I will be doing that as soon as my Mom figures out what boning she needs.
~
At first I thought that this project would be the most defficult project that I have had for a long time but it seems that it didn't take that much to break it to my submission.
Happy Corseting~
Kacie


Wow looks cool! I can't wait to see it finished! Sounds like a fun era to make costumes from!
ReplyDeleteLooks so great! So interesting about the length!
ReplyDeleteAre you going to put wide lace at the top like in the picture? I love that.
Can't wait to see it all done!
Genevieve