Thursday, October 20, 2011

Bee in your Bonnet, Part 2. Finishing.

My last post on my bonnet I left off when I had finished the base.
Today I will show you how I finished it!
~
First I had to decide what color I wanted my bonnet to be.
 I wanted it to be neutral, but I also wanted a color....
When I was at the fabric store looking at silk,(mmmsilkmmm) I found that the price of silk had gone up by about half since the last time I looked at it..I really didn't want to spend $20.00 on one yard of fabric..
so I started looking in the red tags(which happened to be HALF OFF the day I was looking!) and I found some silk for only $10.00 a yard!!! in a BEAUTIFUL color-


I call it river green. It reminds me of the rivers going over the pass.
It doesn't MATCH my dresses but it doesn't necessarily clash (In my opinion).
After finding my "green" fabric, next was to cut out the pieces.
making sure to Fray-check everything!


Since the base is made out of buckram it is a little hard to pin things to it,
so I found a way to keep the fabric right where you put it!
baste it on!


After sewing on the back piece next was sewing the body fabric to the back. To make it lay nicely this is how I shaped it.


based it on.
Then carefully sew on with "invisible" stitches. And Bob's your uncle!


After sewing the back, I next sewed around the brim. then sewed the lining in.
And that's about it!
Next...The part I have always hated. Decorating.
I know, I know, that should be my favorite part right?
well its not. I never know what looks good where and I worry about it far to much.
~
I did know that I wanted a simple bonnet. I didn't really want one that looked like it weighs ten pounds.
I had some 1 1/2" black velvet ribbon that I put along the crown.
I also new that I wanted cream lilacs on the sides. unfortunately for me, Joann's does not carry cream Lilacs...
So what do you do when you can't get the flower you really want? That's right, you make them yourself!
I picked up a remnant of cream silk (once again HALF OFF!!!) and went to town making flowers.


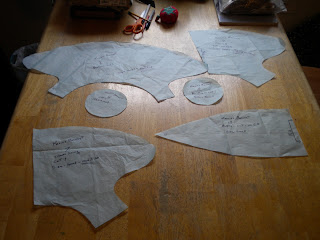
The pattern I made.


F.Y.I. I folded the fabric on the bias not horizontally.


Cut the tip off the bottom


Fray-check the edges.


make LOT'S and LOT'S.


I also picked up some floral wire and White floral tape.


Cover the wire with the tape.


Put a flower at the end of each wire, put the wire's together. and what do you get?
Cream Lilacs!


Here's a view of the back.


after making two bunchs of Lilacs I sewed them onto the sides of the bonnet.


Top view


I am really pleased with how it turned out!
Now I only have 8 months till I get to wear it.
I hope this helps or inspires you to make your own bonnet!
 They are easier then they look to put together!
Happy Hatting~
Kacie

Wednesday, October 12, 2011

Artemis the Arctic Fox

Well... How do I start this post?
Well, lets just say that one night this last week I found a picture on Ravelry that inspired me to the utmost.
It was a pattern for a fake fox stole....if you are like me, your thinking-
 WHAA'THE,INEEDONE!!!!!
The only problem was that the pattern was from a mag' from five years ago and I couldn't find it.
This got me down for about five seconds,
 till I realized that it couldn't be all that hard to knit a fake fox stole!!!
So, I got to work.
It took me about two days secretly working on Arty (Artemis) till the picture in my head came pouring out into reality.


The yarn I used was the left over of Gandalf's beard. Lion Brand Jiffy. color-fishermen.
 I didn't have enough of this for all of Arty, so I had to buy another skein.
And boy, I had JUST enough....


His eyes are antique Victorian buttons that I had gotten at a garage sale years ago.
And they are PERFECT!


He is nice and cozy when draped around the neck as he is knitted in the round
(which means he is double thickness.)


 And there you have it! a fake fox stole! on projects like this I like to keep under close wraps. I won't tell anyone what it is that I am making.
This bothers my Dad, he likes to know what things are :)
he came SOOO close to guessing what it was, to..
I have to give him some killer points for that.
I did write the pattern down so I don't think this is the last Foxxy you shall be seeing ;)
Happy Hunting~
Kacie


Bee in your Bonnet, part 1.


It has taken me nine years to finally come to the decision to make myself a bonnet.
I think one of the reasons it has taken me so long, is
 that I have never tried on a bonnet that looked good on. Plus they can be rather expensive...
So, the week we got back from Mc'' I started planning my bonnet.
Here is where I get a LOT of inspiration from-


I had thought of buying the buckram base then just covering it myself, but alas,
I couldn't find a base that was under $60, and none in the style that I prefer.
I'm not really a fan of the "spoon" bonnet. I'm more of the coal-hodge type.
this style is slightly early, more1850's then 1860's..
When it comes to decisions about, "oh, that's to early.." I think to myself- well, I think that if I lived back in1863 I would most likely have the same personality then, as I do now. I like older styles.
Always have. Always will.

~
We have the McCall's bonnet pattern.
I found that it does come in size's!


Here is the bonnet my mother made few years back.
it's black Dupioni silk.
mmmmsilkmmmm


She used size Large
A little to large for my grape sized head...


even in size Small it was a little to big so I modified the pattern a bit.


I cut a straight line near the back, cut it then taped it back on an inch farther up.


And Bob's your Uncle!


I had to modified a few more pieces as well. nothing to drastic though.

Then I got out the buckram.
Buckram is, well I'm not all together sure what it is but I think it is net that is coated in something rather like glue. It feels slightly tacky to the touch. and it is very stiff.


I cut out the bonnet and sewed the back flaps to form that bonnet shape.
 then I sewed on the wire to help it keep it's shape.


And there you have it the basic shape! it was not as hard as I thought it might be! it was rather easy actually!


In Part #2. I will show you how I covered and decorated Le bonnet!
Happy Hatting~
Kacie

Wednesday, October 5, 2011

spatterdash's

It has begun! the mad dash to get things ready for next year.
In my last post I showed you my List.
 well today I will show you the first thing finished on, said list.
Spats.
I have always liked the look of spats.
They are very historic for the period(1860's) for both men and women.
 plus it is a great way to make boots/shoes that may not be all that accurate, look more so!
Here are my boots.


I know, they are a little to late for the era I reenact but, they are the best I could find a few years ago with out having to spend a butt-load of money.
When ever I start a project that I have to create a pattern form scratch, it always helps to sketch it out.
to get the "feel" of things


The fabric I used is white heavy cotton.


to make the pattern I first traced the outline of the boots


Then I added a half inch for seems, and decide what the bottom edge should look like
It should have a nice curved shape to it.


The outside edge of the spats is where the buttons should be placed.
So I made a half toe section and half heel section pattern pieces.


Next came cutting out the fabric and sewing the heel and toe seems
making sure to leave the button flap open!!!do not sew these closed!!!


Here they are with these seems complete.
you sew the lining in the same manner.


Then with right sides together you sew the lining to the outer at top and bottom seems.
once again, don't sew the button flaps!!!they remain open!


Turn right side out and press


Here they are pinned on the boot.


The buttons that I got are 3/8'' black shank back plastic.
I got these because they look like they could be glass. but cost a lot less!


They are not solid black. but from a distance you would never know.


I thought they had a really nice shape to them.


Now, on the button flaps you iron the edges in a half inch.
you want it so it looks smooth and clean on both sides.
Then top stitch the opening closed.


Mark the button holes.
On my spats the math worked out perfectly, I had 16 buttons, the button flap was 9 inch's from top to bottom. so at top and bottom I placed a button half inch form edge then every inch. 8 button on each spat.


Now to sew the 16 button holes by hand...


yay! all done with that part!

Then sew on the buttons and the flaps that go under the arch of the foot
and befor you know it, you have spats!


To measure for the arch flap.
Put the spats on over the shoes you will be wearing them with and measure the distance between.
Making sure to figure in the button and button hole!


And there you have it! a pair of spats to keep you're shoes nice and tidy!


First thing crossed of the list!

I hope this may help you if you are wanting to make some spatterdash's!
Happy Spat(ting)~
Kacie