Tuesday, April 24, 2012

Taming the Beast


Time to finish this beast.

~

In my last post I ended with sewing the boning channels.
Once that was done I put the boning in, put the binding on, laced it up and my fatal mistake. Waiting till every thing was sewn in place to try it on... When making a Corset, you should NOT do this....
As you know I had to lengthen the corset by a few inches to make it fit properly. Well, it was long enough all right. I nearly cried when I tried it on and found that I couldn't sit down it was so long. 
So I proceded to rip out the binding, cutting off about one inch from the bottom, and resewing every thing back up...Once again, I nearly cried when I tried it on the SECOND time. I now had a hard choice to make. Do I let it slide and just avoid sitting down. Or do I do it the RIGHT way and rip out the binding again, cut about half the boning down anywhere from one to two and a half inches....

~

I did the right thing. It took the better part of two days but, gosh darn it, I got it done. The third time that I tried it one I did NOT cry.
All in all, I shortened it by about two and half inches.

~
Once getting the length finally figured out, I was able to start finishing it.
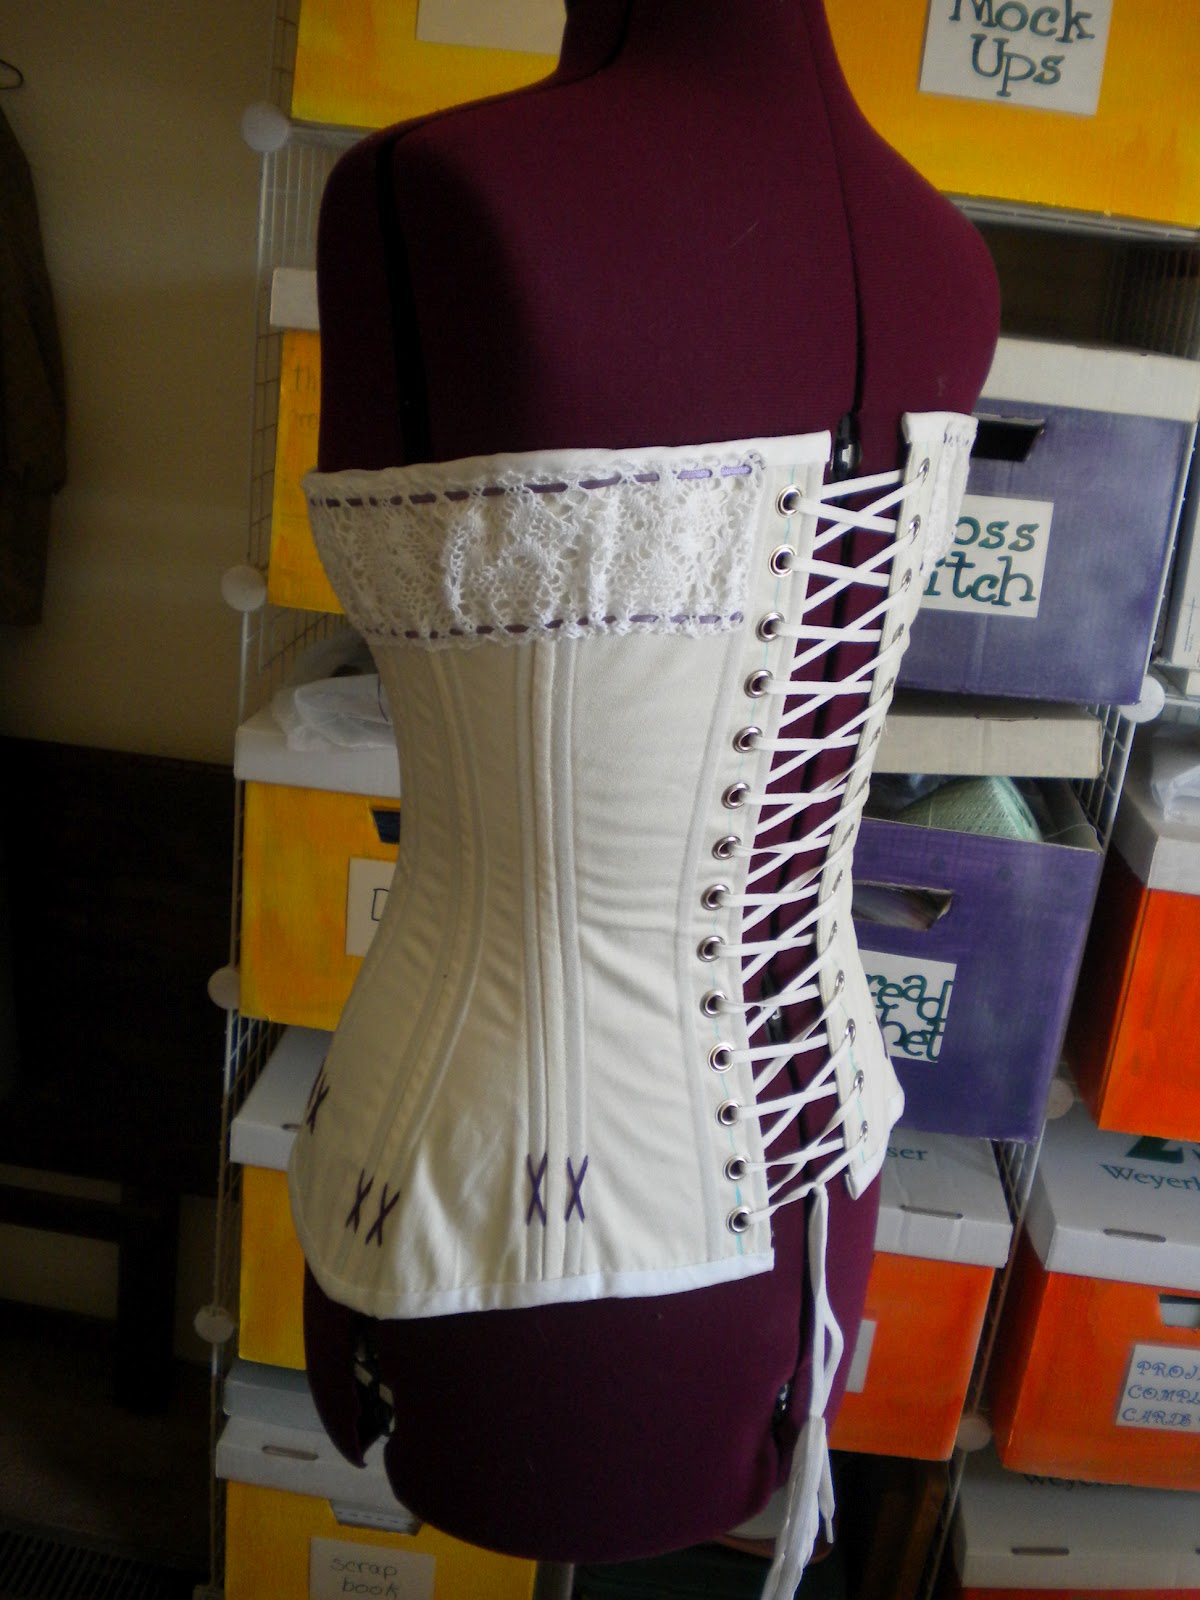
Fun stuff. sewing the X's at the bottom of the boning, and putting the wide lace at the top.


I am very pleased with how it came out.
One of the best parts is that it is a very comfy corset. I know you wouldn't think that a corset could or would be comfy, but if you have a corset that is made FOR YOU and that fits you like a glove. You can easily wear it all day and at the end of the day not be screaming to take the thing off. 


Hear we have my 1860's corset on top so you can see how different it is!


side by side.


And there you have it! the Beast. When starting this corset I thought it would be a rather hellish sort of project, but it turned out not to be as bad as it could have been.
In fact after making this corset I would like to re-do my 1860's corset. Not anytime soon though...

Happy Corseting~
Kacie


Tuesday, April 17, 2012

1902 corset part #2.


Where to begin?
In my first 1902 corset post I ended with finishing the re-drafted pattern.
~
After getting the pattern ready I had to decide what type of fabric I wanted it to be made out of.
You can use anything from silk, wool or cotton to construct a corset.
I chose some lovely cream colored twill.
                                                                      

You really only need to line a corset if you are making it out of something light weight like silk, or cashmere, but I decided that I would line it anyway. So I wouldn't need to get twill tape for the boning channels.


On the outer seems I decide to do french seems. It takes longer but it makes it look much better. Plus it gives the corset added strength. I did regular seems on the lining. Once I had the outside and lining done I had to wait a few weeks before we where able to order the boning and other needed supplies.
~
The supplies arrived and I was able to get back to work.

Marking for the busk. It takes time. If you take that time and do it right, it pays off!!


The gaps where the hook side of the busk go through.


Top stitching for the hook side.


The finished hook side of the busk.


The entire busk complete.


Base stitching the lining and outer to make sure that while sewing the boning channels,
 the outer and lining stay where you want them.


Ready to sew the boning channels.


All the boning, eyelets and lacing.


Some of the pieces that I ordered where to long so I had to cut a "few"* down.
(* when I say a few, well.. I will get more into that in my next post...)

Two of the pieces cut down and ready to use.


Aren't they cute little baby boning? The smaller ones are only 3'' long.


The corset with all the boning channels sewn, washed to get the pen markings out and ready for the "final" steps.

And that's all for now folks!
Happy Corseting~
Kacie

Wednesday, March 28, 2012

Queen Bee Bonnet part #2.

If there is ever a time when I don't post for a period of time, don't think it's because I'm not doing anything. In fact it's the opposite. I am doing so much that I have no time to post.
~

A few weeks ago I finally finished my Mom's bonnet.
The part that I was stuck on?
Making the roses...
They are made like a normal ribbon roses, but instead of using ribbon, I used strips of silk.
Here are all the flowers, finished and ready to be put on the bonnet.

Decorating the bonnet has to be one of my least favorite parts about making a bonnet. I know, you would think it is the best part!
I do not think this.
 I have always found it hard trying to figure out what looks good and what just looks like crap.
~
When decorating a bonnet it is best to start with the base ribbon.


Once you get the ribbon on the way you want it. Pin the flowers on in different ways to see what you like the best. When you find the arrangement you like the best, sew it all down.
And poof! You have a finished bonnet!


It felt so good getting this done!
I am very pleased with how it turned out, and so is my Mom.
This being my second bonnet that I've made, I have found that I really enjoy making them!
I have even thought about making one or two to sell on my etsy. Maybe.
Happy Hatting~
Kacie


Sunday, March 4, 2012

ANNOUNCEMENT!!!

It has taken me a few months, a few tears,
and LOTS of help from my wonderful family and friends.
To finally be able to announce the official opening of my new etsy shop

Now some of the things that you see on this blog you can have for your very own!!!
~
The name credit goes to my Dad.
I want to thank you all for leaving so many ideas.
There where so many that I wish I could have used them all!
~
So, visit my shop,
and tell your friends, so they can tell their friends!


Happy Shopping~
Kacie

1904 update

I am finally able to post some progress on 1904.
I was able to work on and finish my walking skirt.
It took me only a few hours from starting to sew, till I was done with the hooks and eyes.
One of the easiest skirts I have ever made.


The back.


I am really pleased with how it turned out.
 I  wasn't sure about this style of skirt at first, but I like it a lot better then I thought I would.
I can't wait to see it with the corset, and bodice completed.
Happy Sewing~
Kacie

Saturday, March 3, 2012

Beauty AND Science.

Currently I am reading Moby Dick for the second time.
I have to say, I am enjoying it much better then the first time.


When reading the one chapter where he is describing the various whale types, I had a thought-
"WHAT TYPE OF WHALES ARE THESE?"
Than I had another thought-
"Wouldn't it be cool to have an embroidery wall hanging with the different whales on it with there common names and less common names so I would know what he is talking about!"
And so it began.
Once that little bug got in my head I couldn't get it out.
~
Internet, what would I do with out you?
With out it this project would not be possible.
well maybe it would, it would just be a lot more work.
I found pictures of the whales that I wanted with the little diver for perspective.


Changed the diver to lines, wrote the whales info underneath.


My three favorite whales :)
The Sperm whale
the Fin back whale, and the Narwhal.


Traced it all on a big piece o' paper.


Yes. those are Harpoons crossed over the top.
When researching for the harpoons, I decided that I wanted a 19th whaling harpoon.
I mean, how awesome would it be to have an 11' harpoon mounted on the wall?


After much frustration, I finally found the remainder of the fabric that I used for my map wall hanging.


Traced it out.


And began.


Happy Whaling~
Kacie